You spent your Sunday evening on it. Twelve pages, your best fonts, a mood board on page three. You sent the proposal on Monday morning. It's now Thursday, and your inbox has forty new emails. None of them is from that client.
Then the reply arrives: "Thanks, this looks lovely! Quick question, what's included in the price again?" They read the cover and skipped to the number. You feel deflated, and you start wondering whether you priced it wrong.
This post gives you a design proposal template you can copy, section by section. A proposal that gets signed doesn't need to be longer or prettier. It needs to answer the client's questions in the order they ask them, and then make saying yes easy.
I learned the hard way that a proposal shouldn't be too wordy. What a client wants to know is simple: what you'll deliver, how you'll deliver it, when, and how much. Everything else can wait until they've said yes.
What a client is really asking
When a client opens your proposal, they have four questions. Do you understand my problem? What exactly will I get? How much, and when do I pay? What do I do next?
Most proposals answer these in the wrong order. They open with the studio's story and its process, and the client has to dig for the answers. Every section below answers one of those four questions, in the order the client asks them.
1. Start with their problem, in their words
Your first paragraph is about the client, not about you. Write back what they told you on the discovery call. Use their words, and name the result they want.
Something like: "You told me customers keep mistaking you for a cheaper brand. You want a look that shows the quality of what you make." When a client reads their own problem written back clearly, they feel heard. That feeling does more selling than any portfolio page.
Keep it short. Two or three sentences is enough. Your about-me section can come later, or not at all. They already found you.
2. Show the plan before the price
Next, show what you'll make and how you'll get there. List the deliverables in plain words: "Logo suite: main logo, badge and monogram", not "Brand identity system". Say how many revision rounds are included.
Then add a simple timeline. Name each stage and roughly how long it takes: discovery, concepts, refinement, final files. A client who can see the steps trusts the price more, because they can see the work behind it.
This is also where you say what isn't included. "Website design is not part of this proposal" saves you a hard conversation in week three.
3. Price the outcome as a package
Price the project as one package with a clear name, not as a list of hours. "Brand identity, $2,800" is easy to say yes to. "40 hours at $70" invites the client to ask which hours they can cut.
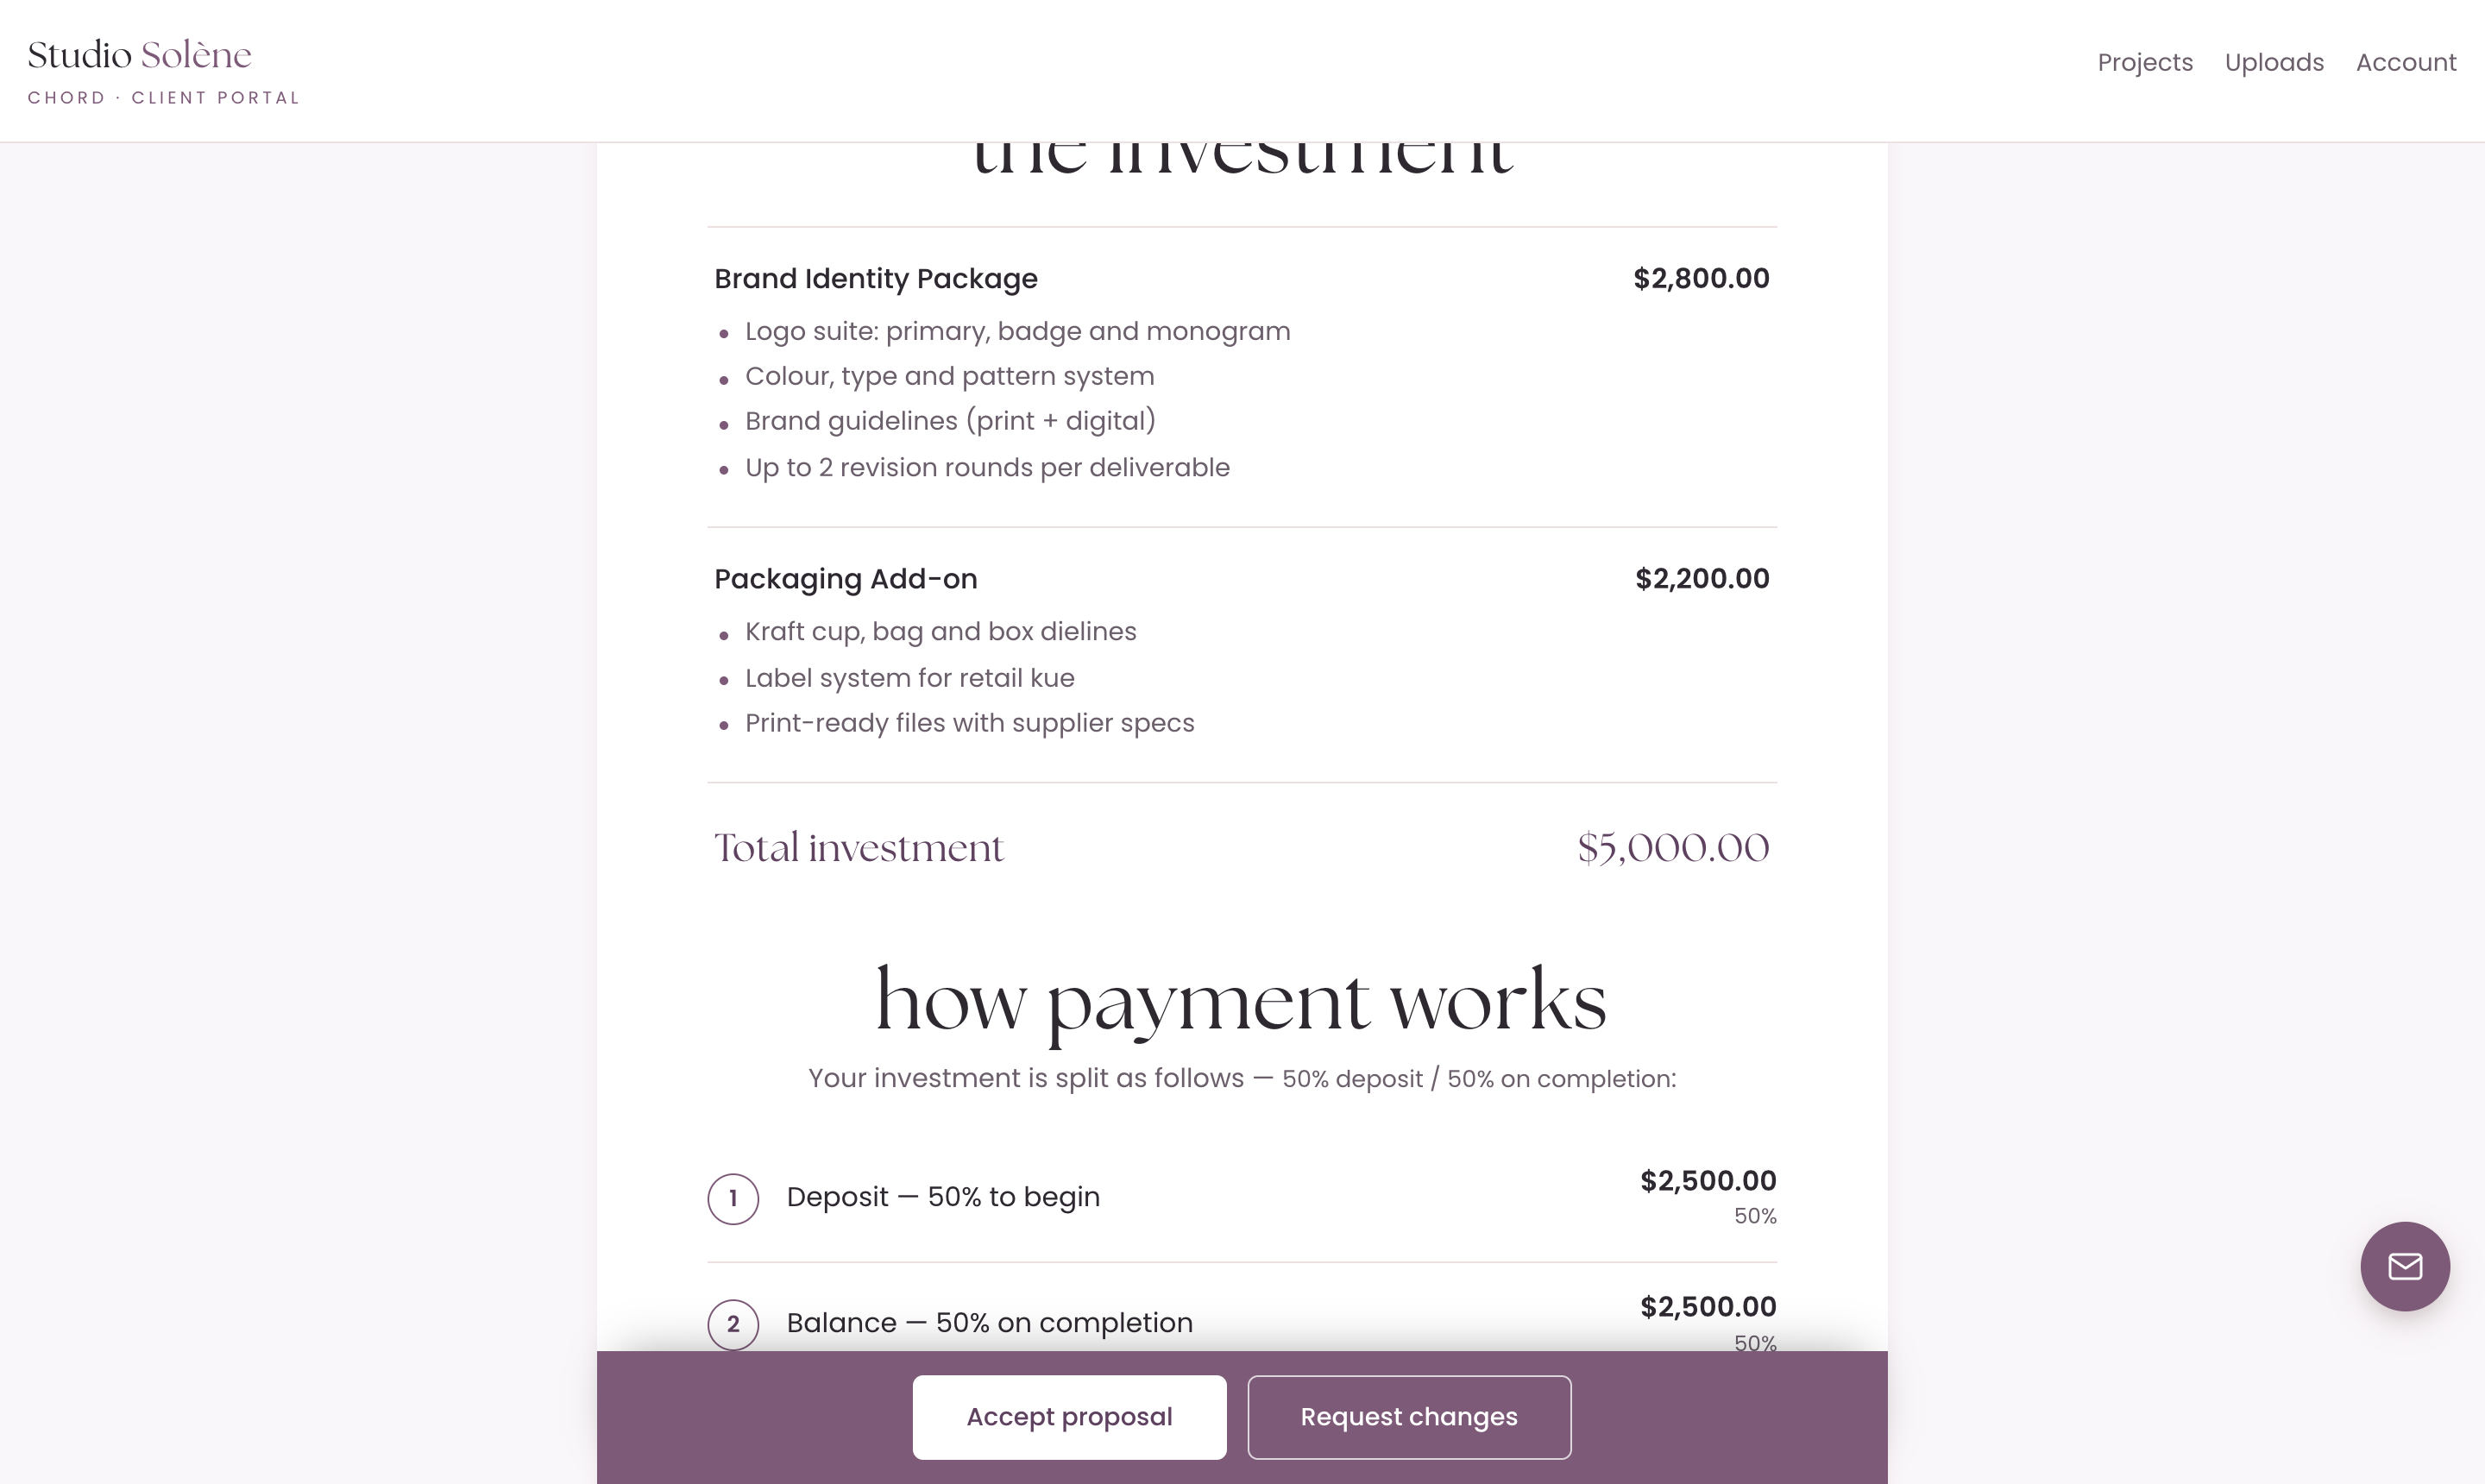
If there's a natural extra, list it as its own line with its own price. A packaging add-on or a set of social templates works well. The client can see what the core project costs and what the extra adds.
Some designers like to offer three options: a smaller, a recommended and a bigger version. That can work, but only if the options are clearly different. If you're unsure, start with one recommended package. One clear choice is easier than three similar ones.
4. Make the payment plan part of the proposal
Don't leave payment for the invoice. Put it in the proposal, so the client agrees to it at the same time as the work.
Say how much the deposit is and when the rest is due. A 50% deposit with the balance on completion is common for creative work. On longer projects, you might split it three ways. Show the actual amounts, not only the percentages, so nobody has to do maths.
A clear payment plan also protects you. The deposit means the client is committed before you start, and it means you're never owed the whole fee at the end. (I wrote more about this in how to get clients to pay on time.)
5. Answer the questions before they ask
Every client has the same handful of worries. What if I don't like the first concepts? What happens if I need more changes? Who owns the files? How do we talk during the project?
Add a short FAQ with three to five of these. Answer each one in a sentence or two. When a client finds the answer on the page, they don't need to email you, and the proposal keeps moving instead of stalling.
6. End with one clear next step
The last section tells the client exactly what to do. Avoid "let me know your thoughts". That sentence invites a week of thinking.
Give them a single step: "Click Accept, and I'll send the agreement to sign and the deposit invoice." Better still, give them a button. If they need changes, give them an easy way to ask for those too. A client who can ask a question in one click is much less likely to stop replying.
Your design proposal template, section by section
Here's the whole thing in one list. Copy it into whatever you write proposals in.
- Their goal. Two or three sentences about their problem and the result they want, in their words.
- What you'll make. The deliverables in plain words, plus the revision rounds included.
- What's not included. One or two lines that set the edges of the project.
- Timeline. Each stage and roughly how long it takes.
- Investment. One named package, plus any extras as separate lines with their own price.
- How payment works. The deposit and the balance, as amounts and dates.
- Good to know. Three to five short answers to the usual worries.
- Next steps. Accept, sign the agreement, pay the deposit, and we begin.
Once a client knows those eight things, they have everything they need to say yes.
Build it once, then reuse it
Writing that template from scratch for every client takes hours. In Chord, the client tool I run my own studio on, you build a proposal from blocks: text, text and image, columns, a gallery, packages, a payment plan, a timeline, an FAQ and a next-steps band. You drag them into the order you like, and save the layout as a proposal template for the next client.
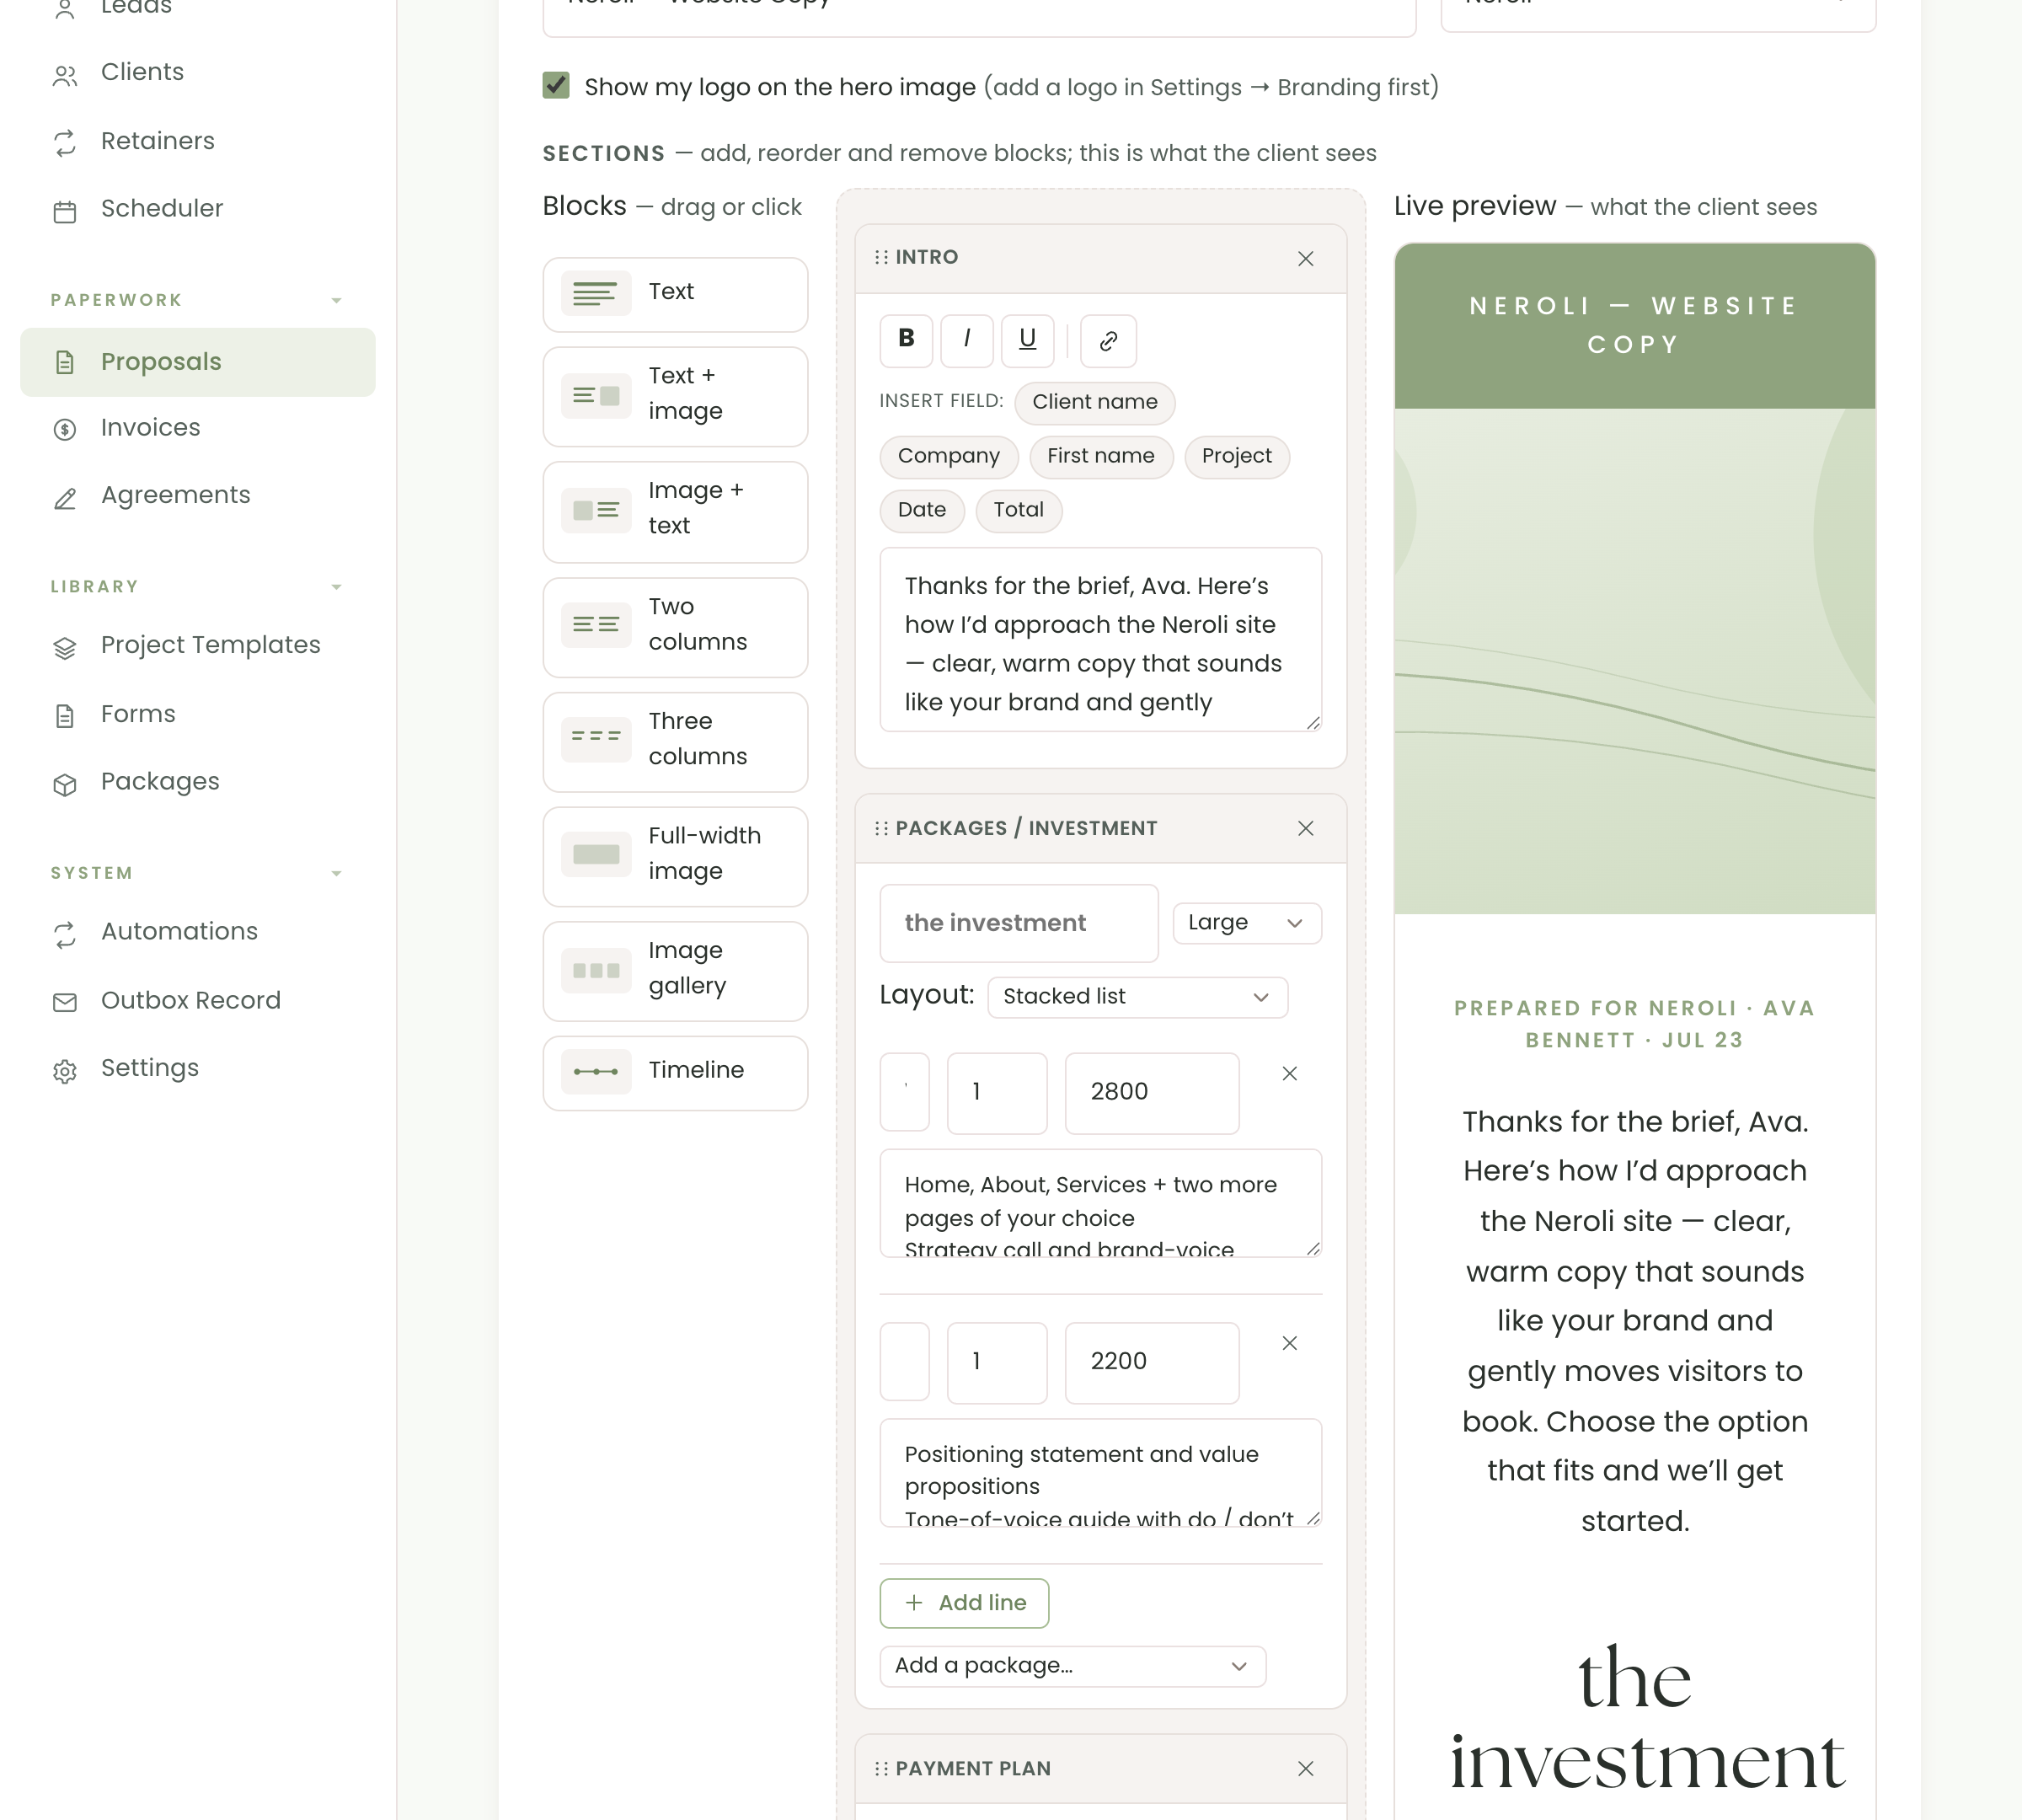
Your saved packages drop straight into the investment section, with their names and bullet points. Pick a payment plan, such as a 50% deposit and 50% on completion, and the proposal shows the real amounts for that total.
The timeline can fill itself from one of your project templates, with each stage counted in working days.
Your client sees the proposal in your colours, with two buttons at the bottom: Accept proposal and Request changes. You get an email either way. If they ask for changes, you duplicate the proposal as the next version and send it back.
You can also see when the client has opened it. The proposal's status changes from Sent to Viewed, so you know whether a follow-up note is needed.
Another option is to share the proposal with a private link and a short access code. On that one link, your client accepts the proposal, signs the agreement you attached and sees the deposit invoice, one step after another. The link shows your bank or QR payment details, and the client can upload a screenshot when they've paid.
The short version
Open with their problem. Show the plan before the price. Price one clear package. Put the payment plan in the proposal. Answer the usual worries. End with one button.
A proposal like that doesn't sell harder. It just makes yes the easiest thing for your client to do.